Wallbox Pulsar Max 22kW 5m Cable

Wallbox Pulsar Max 22kW 5m Cable

Regular price €649,00 EUR
Regular price Adviesprijs: €799,00 EUR Sale price €649,00 EUR
Sale Sold out
Tax included. Shipping calculated at checkout.

In stock

Order before 9 PM for free same-day shipping.

Waarom kiezen voor ons?

Op werkdagen voor 21:00 uur besteld, vandaag verzonden*

Gratis verzending in Nederland & België

30 dagen bedenktijd

Ophalen mogelijk

Achteraf betalen mogelijk

Plus- en minpunten

  • Robuust ontwerp, speciaal geschikt voor buitengebruik (hoge IP-classificatie).
  • Laadvermogen tot 22 kW.
  • Geïntegreerde Wi-Fi en Bluetooth voor app-bediening.
  • Dynamic Power Sharing en verbeterde functionaliteit voor grotere installaties.
  • Hogere prijs in vergelijking met de Pulsar Plus.
  • Geen ingebouwde energiemeter.

Product Description


The Wallbox Pulsar Max retains the advanced performance and compact size of the Pulsar family, but features an improved robust design. In addition, the charger now has an IK10 hardened plastic protection rating and is easier to install.

Furthermore, the Wallbox Pulsar Max is a versatile home charger with various smart functions, including Wi-Fi and Bluetooth. The charger's power output depends on your car's onboard charger and your grid connection. The charger's compact and elegant design makes it easy to operate via an APP and comes with an integrated fixed Type 2 charging cable.

The charger can be set between 6A and 32A, making it suitable for a wide range of electric cars with different charging capacities. The charging station supports both 1-phase and 3-phase charging and is compatible with both electricity connections.

Some advantages of the Wallbox Pulsar Max are that no subscription is required for using charging point management and app services, that it can be extended with Dynamic Load Balancing, and that charging costs can be settled with your company or employer via e-flux.io.

The charger can be managed via the Wallbox app, the myWallbox portal, Wi-Fi or Bluetooth, and no back-office subscription is required. With the myWallbox portal, you can configure, monitor, and manage the charger, while the Wallbox app allows you to view and manage all device settings from your mobile phone or tablet. App features include setting the charging current, locking and unlocking the charging station, and scheduling charging sessions.

Through us, you receive a standard two-year manufacturer's warranty on this product. This means you can enjoy a properly functioning product for two years without any worries. If a defect arises within this period due to a manufacturing or material fault? No worries, the manufacturer will ensure that this is resolved for you free of charge.

The warranty is handled directly by the manufacturer. This means you can count on the expertise and fast service of the brand itself, so that any problems are resolved quickly and efficiently.

Do you have any questions or would you like more information? Our friendly customer service team is always ready to help you!

Simplify the process of installing the charging point by purchasing it through slimmelaadpunt.nl. Let the professionals take care of the installation for you, without any worries. Only available in the Netherlands.

Please note, only labor costs are included. Costs for materials and additional work are not covered by the installation package.

User Manual

Pulsar Max – Online Installation Guide

1. Technical Specifications

General specifications

Charging Mode (IEC 61851-1) Mode 3
Dimensions without cable 198x201x99 mm (without cable)
Weight without cable 1.3 kg (without cable)
Operating temperature -25 ºC to 50 ºC
Storage temperature -40 ºC to 70 ºC
Environmental ratings IP55, IK10 (High Resistance)
Installation site Indoor and Outdoor use
Mounting type Fixed equipment will be wall-mounted. Floor mounting with suitable Wallbox accessories.
Intended for use Equipment intended for use by ordinary persons.
Location Access Equipment for both unrestricted access locations and restricted access locations
Product conformity RED Directive 2014/53/EU, RoHS Directive 2011/65/EU and BS 7671:2018+A1:2020+A2:2022 Compliant with UK Smart Charge Regulations

Electrical specifications

Charging power 7.4 kW (1P) 11 kW (3P) 22 kW (3P)
Nominal voltage AC ± 10% 230 V 400 V 400 V
Configurable current from 6A to rated current
Nominal frequency 50 Hz / 60 Hz
Nominal Diversity Factor (RDF) 1
Residual current detection 6mA DC
Nominal insulation voltage 400 V
Nominal impulse withstand voltage 4000 V
Overvoltage category CAT III
RCCB Type A, B or EV may be required according to regional regulations
Protection against electric shock Class I
Cable cross-section Up to 13 mm²
EV power supply equipment connection AEVCS permanently connected to AC mains
Pollution Degree PD3
Electromagnetic environment Class A + Class B

2. Safety Warnings

Safety Warning Icons
  • Flying debris, risk of eye injury
  • Risk of Electric Shock. Disconnect and wait 10 min
  • Caution
  • Sharp element, risk of cuts
  • Earth connection required
  • Special waste disposal

3. Tools and Mounting Parts

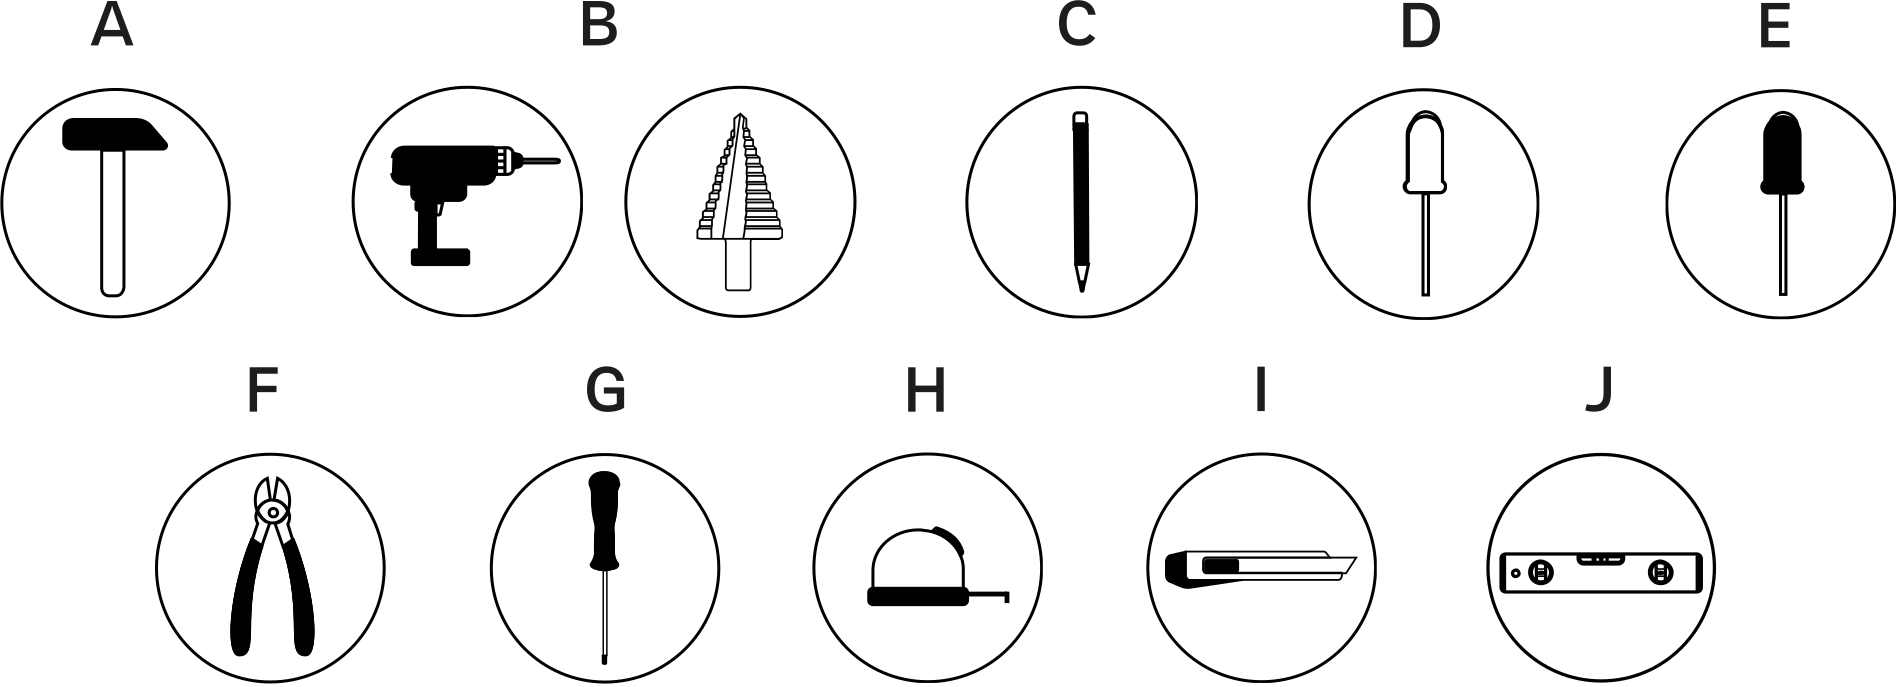
Required tools

tools & mounting parts
  • Hammer
  • Step drill 32mm and 8mm drill bit
  • Pencil
  • Flat screwdriver
  • Phillips screwdriver
  • Cutting pliers
  • Torx T20 and T15
  • Tape measure
  • Utility knife
  • Spirit level

Included mounting parts

  • Phillips screws ø6 x 50 mm
  • Phillips screws ø5 x 40 mm
  • Wall anchors ø8 x 40 mm
  • M32 gland
  • Torx screws T20 4 x 10 mm
  • Torx screws T15 ø3.5 x 8 mm

4. Preparing the charger

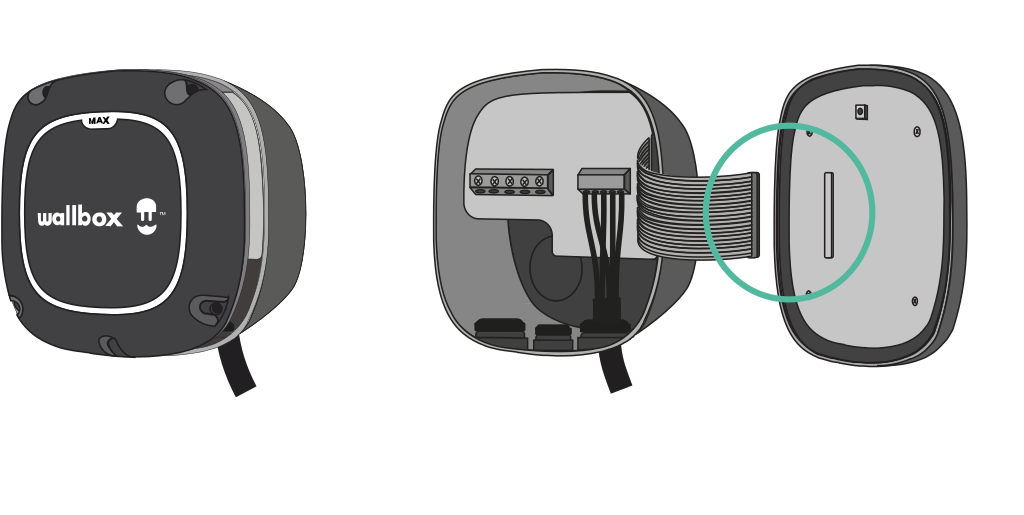
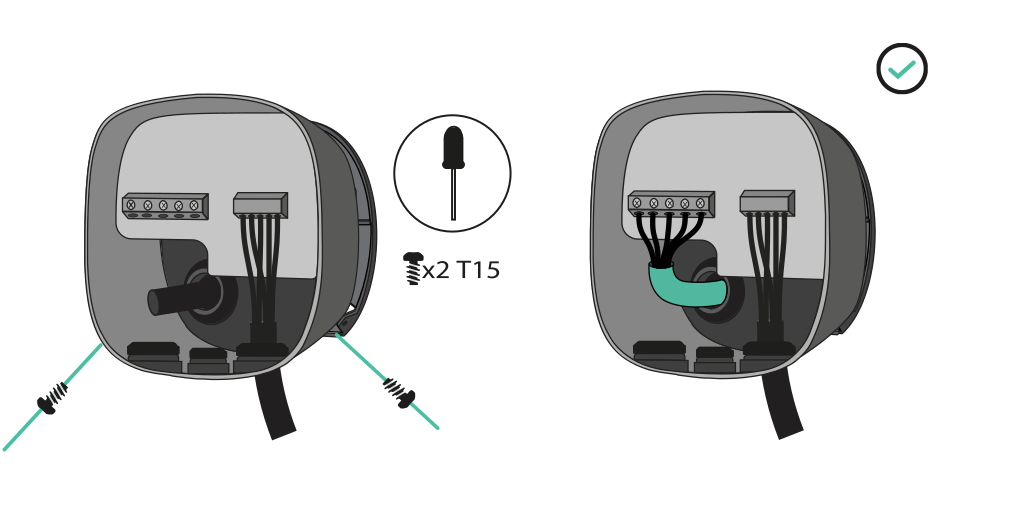
Remove the two corner screws and carefully lift the cover. Then, carefully disconnect the ribbon cable and set the cover aside.
Before continuing with the installation, make sure to switch off all connections.

5. Installing the Wall Plate

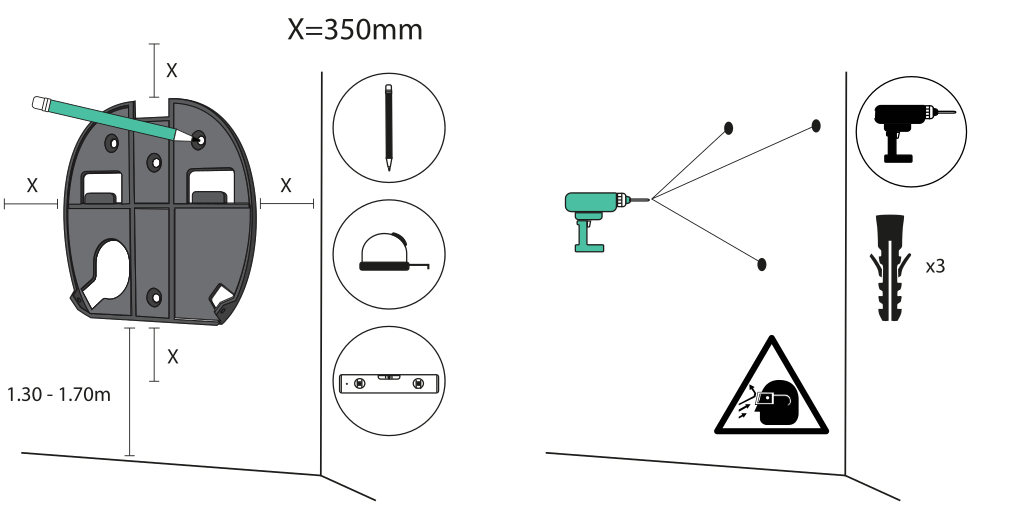
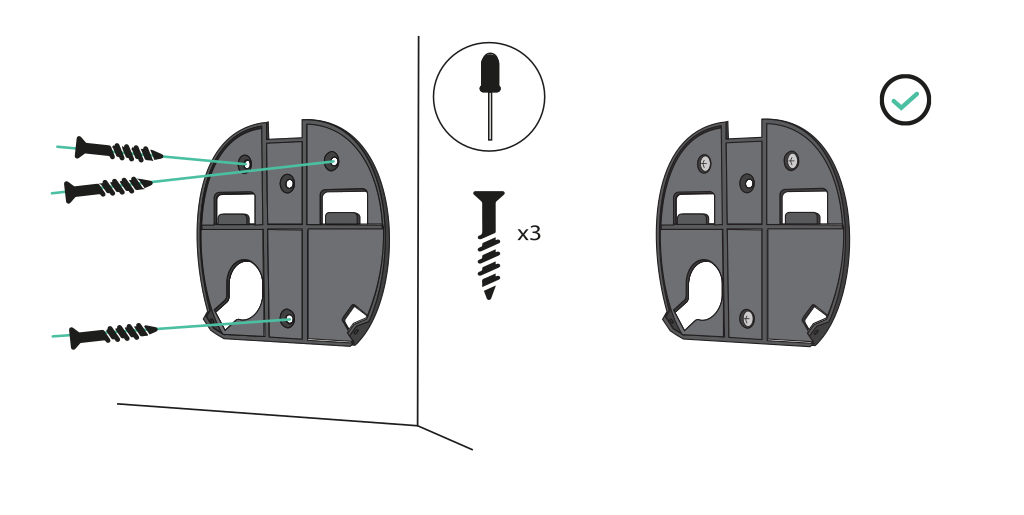
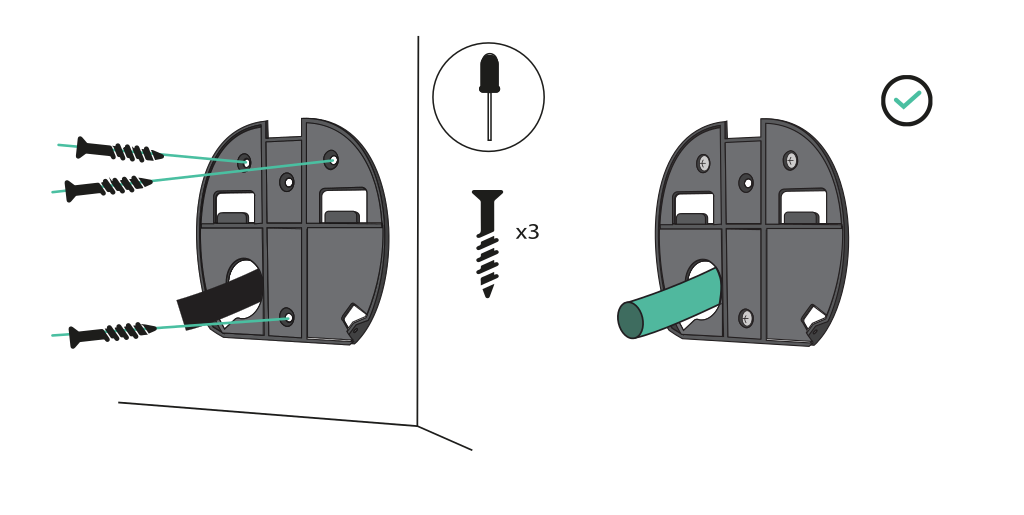
Remove the tape from the wall plate to detach it from the charger. Then, level it and mark three holes with a pencil. Now, with an appropriate size drill, drill and insert the wall plate aligned with the holes.
If you are attaching the charger to a solid wall, use the wall anchors provided with the charger. Secure the wall plate to the wall and do not overtighten the screws.
If the power supply wiring comes from inside the wall, you must thread the wires through the hole in the wall plate before securing the wall plate.

6. Lower Connection

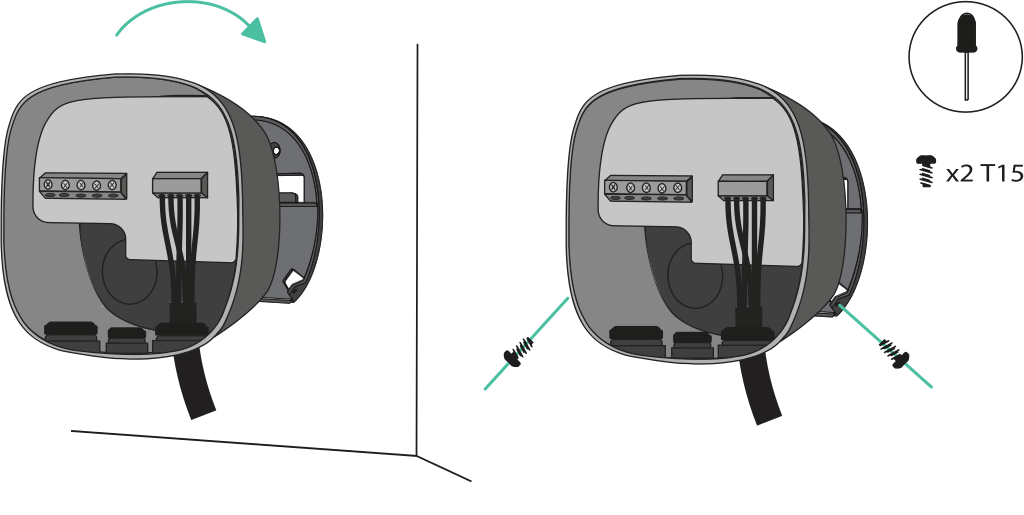
Both lower and rear connections are possible when installing Pulsar Max. If you want to install the product through the lower hole, you must follow the instructions below. For the rear connection, go to chapter 7. Lift your charger and hang it at the top of the wall plate. Secure the charger to the wall plate with the appropriate screws, do not overtighten them.
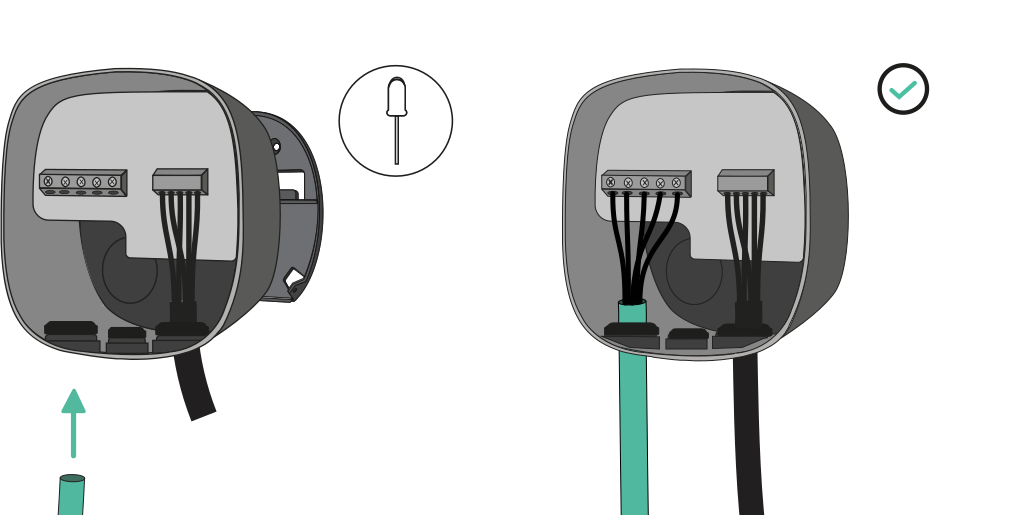
Make an incision in the gland and insert the power supply cable.

7. Rear Connection

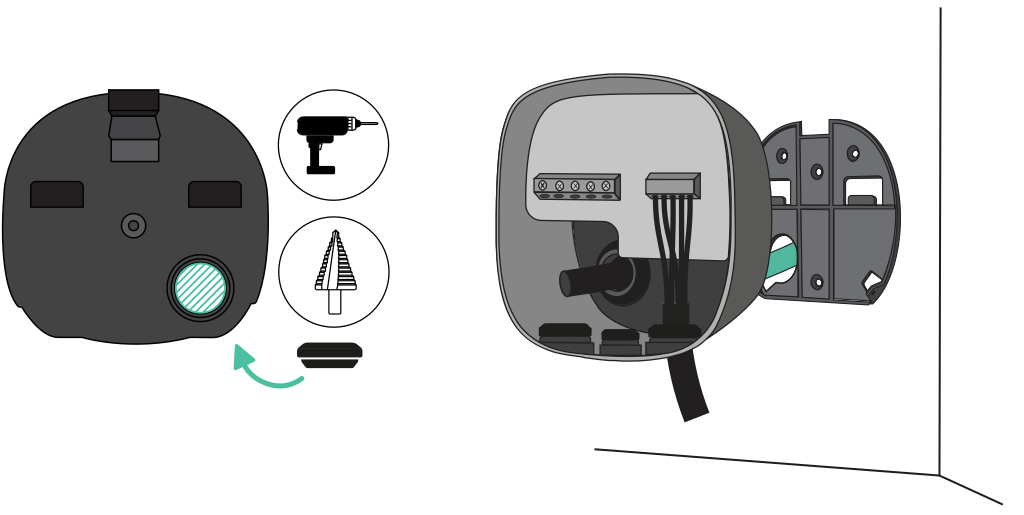
Make a hole on the rear of the charger with a 32mm Step drill. Then, make an incision in the gland and insert the power supply cable.
Secure your charger to the wall plate and secure it with the appropriate screws.
Head to the EMS Installation Guide to discover which features are supported by Pulsar Max.

8. Electrical Wiring

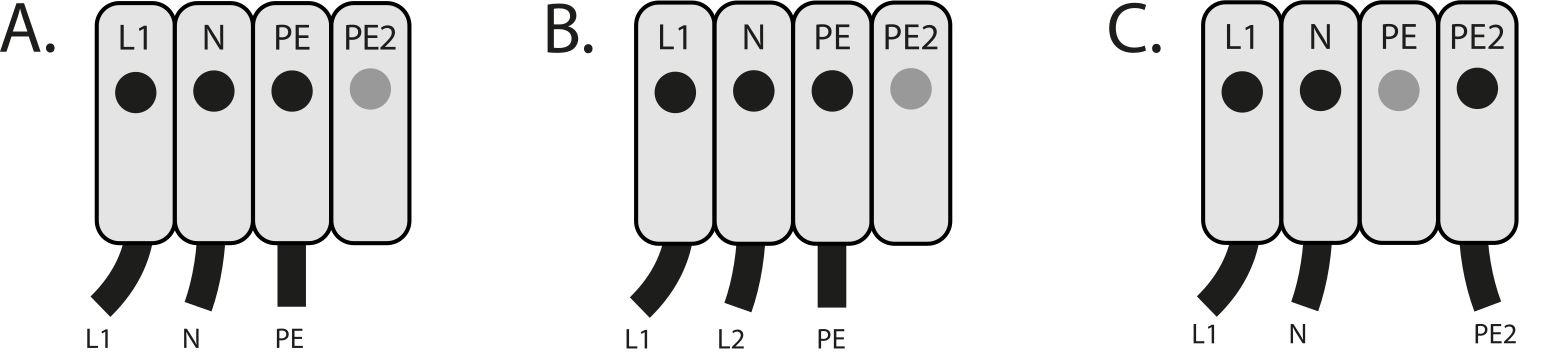
Single-Phase Version

  • Single-phase setup
  • Bi-phase No Neutral
  • Single-phase PME
(UK only) can be connected to PME supply in accordance with BS7671:2018-amd1:2020 722.411.4.1

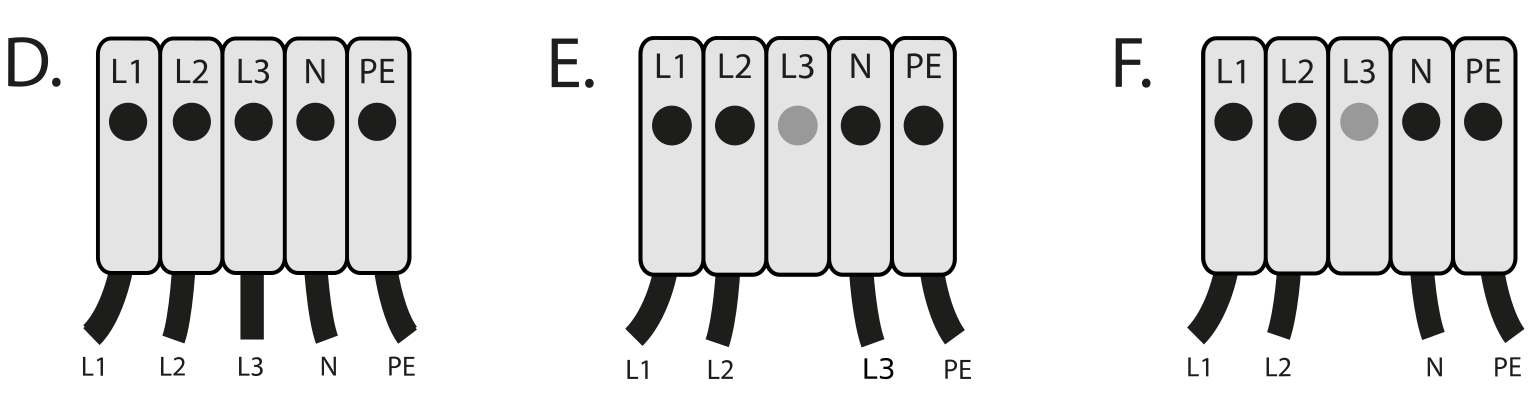
Three-Phase Version

D. Three-phase setup E. Three-phase no neutral setup F. Bi-phase setup For the three-phase no neutral installation, verify compatible EV models that support this configuration. The Pulsar Max three-phase version can be installed with A – B setups.
Ensure the maximum voltage between L & N inputs is lower than 264V.

9. Closing the charger

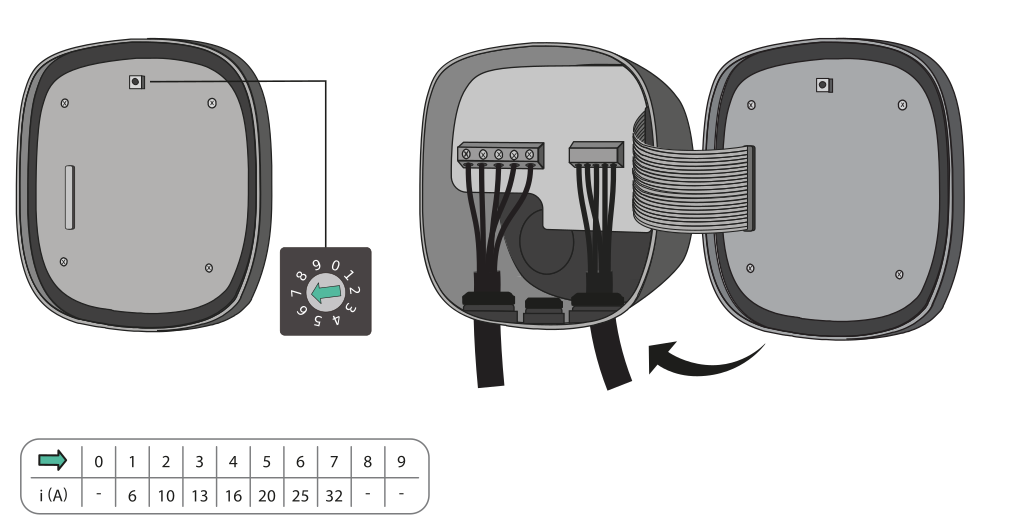
Set the current selector to an appropriate setting. Then, carefully reattach the communications cable to the charger’s cover and close it. Ensure the selector is not pointing at 0, 8, and 9.
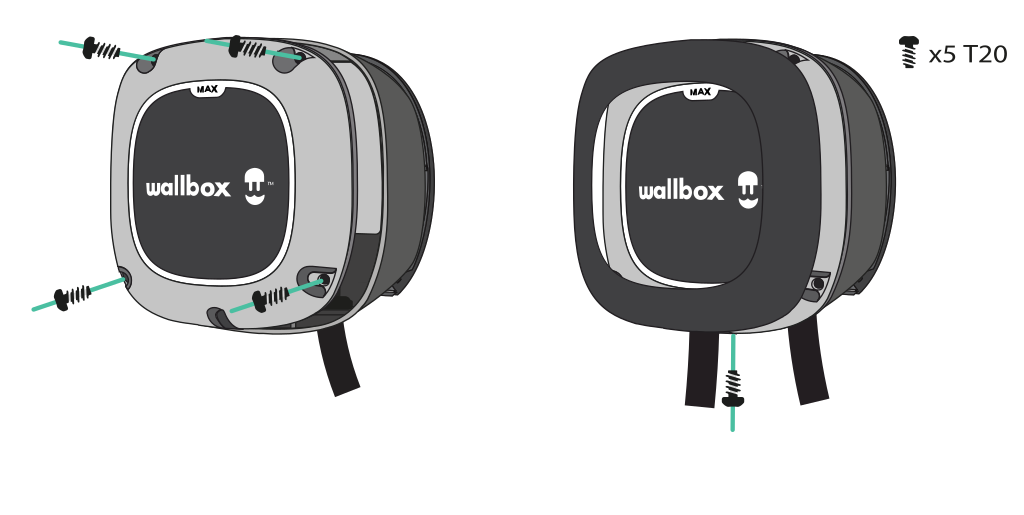
Place the four corner screws to secure the charger’s lid. Make sure you align the bottom screw opening correctly, place the cover frame on your charger, and secure the frame with the screw. Do not overtighten.

10. Installing the Plug Holder

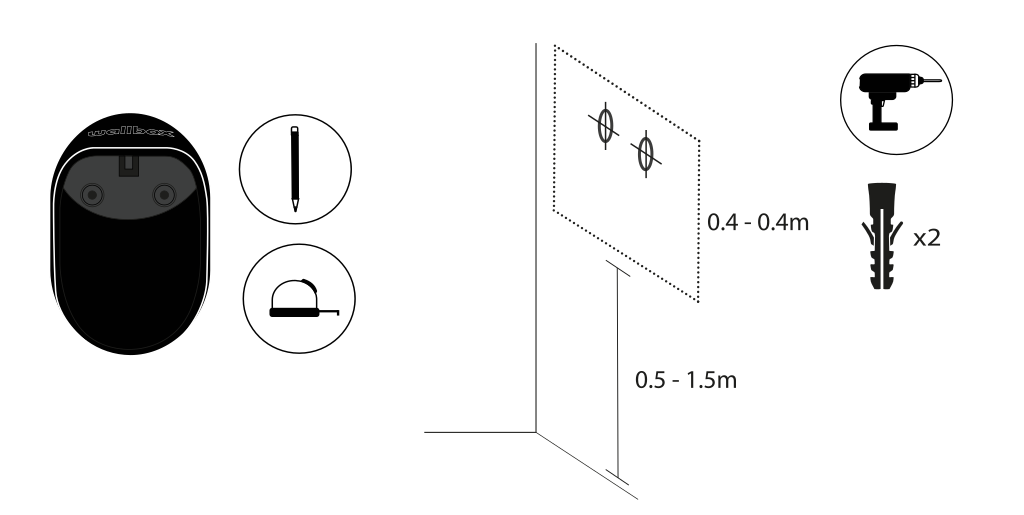
Place the plug holder on the wall and mark the fixing points. Then drill holes where the fixing points are marked.
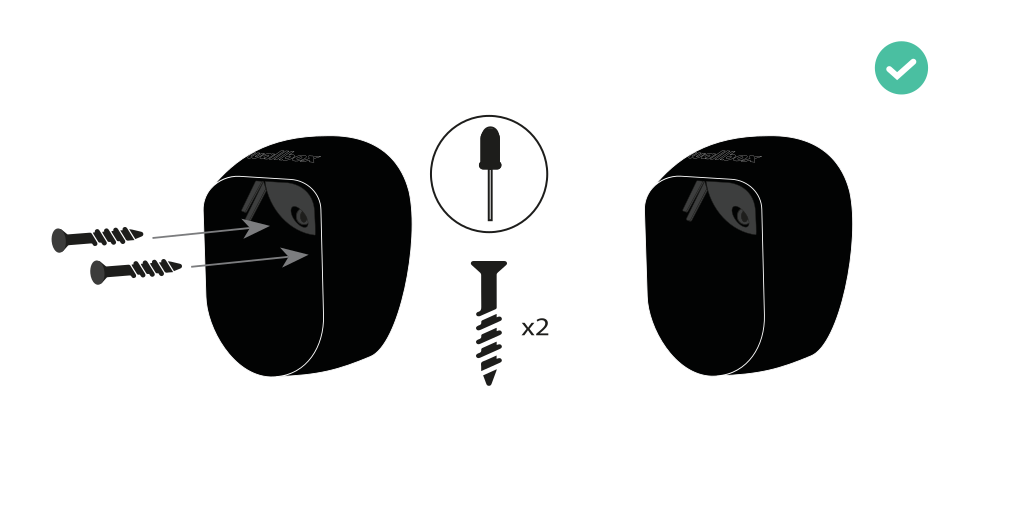
Insert the anchor screws into the fixing holes. Then attach the device to the walls by inserting and tightening the screws.

11. Register the charger

Download the Wallbox app and register.
View full details
  • Powerful

    Just

    the beginning.

  • Fast and full of next-generation charging intelligence. The compact Pulsar family offers easy charging combined with advanced options, so you can enjoy electric driving.

Why the Pulsar family?

Fast charging

Charging solutions up to 22 kW offer up to 10 times faster charging speeds and savings through off-peak charging schedules. Benefit from surplus solar energy with flexible connectivity options for any location and number of users.

  • Ease

    Forget the gas station. Bring fast charging power to your home.

  • Savings

    Charge when energy is cheapest and unlock new ways to save.

  • Reduced ecological footprint

    Charge with solar power or even use the power in your car to supply your home with electricity.

1 of 3
  • Energy management

    Your charging system is now also an energy management solution.

  • Unlock the full potential of the Pulsar family with a Wallbox energy meter and our built-in energy management features.

  • Dynamic Load Balancing

    Maximize charging speed while remaining within your home’s power limit. If total power consumption is high, charging speed decreases. If other power consumption is low, you charge at maximum speed. That’s optimized energy.


    Prevent your fuse from blowing
    No expensive upgrades or unexpected energy bills
    Add a second electric car, or more, whenever you want

  • Solar Charging

    Harness the full power of your solar panels. Avoid high energy prices by charging your EV with 100% solar energy or a combination of solar and grid power. The choice is yours.


    Prevent blown fuses
    Sustainable
    Maximised ROI on solar panel installation

FAQs

Yes! Wallbox has extensive options for Type 1, Type 2 vehicles and an option for a socket including shutter protection, for maximum flexibility. Our Pulsar family is compatible with any hybrid and electric car.

The price for charging your vehicle at home depends on how much you pay for each kilowatt-hour (kWh) of electricity consumed. In other words, if you want to fully charge a Nissan Leaf with a 62 kWh battery in the EU, at a kWh rate of 4.8 cents and a maximum range of 364 km, you will pay approximately €13. However, if you want to charge a Tesla Model X with its larger 95 kWh battery, it will cost closer to €20, with a range of up to 625 km. The final cost is still relatively lower than for internal combustion engine vehicles, not to mention the lower environmental costs due to CO₂ emissions.

Absolutely! Using the Wallbox app, you can create, delete, and edit scheduled charging sessions for your Wallbox charger, regardless of your location. Whether you're near the charger and using Bluetooth or accessing it remotely via Wi-Fi, you're covered. The Wallbox app allows you to check the status of your charger and schedule charging for off-peak energy periods. Ready to get started? Download the Wallbox app from the Apple App Store or Google Play Store.

That’s right! Solar Charging EV charging software allows you to charge your electric car with 100% solar energy, or a combination of solar energy and electricity from the grid. To enable Solar Charging, you must pair it with one of our energy meters. Once installed, you only need to set your preferred mode directly from the Wallbox app and let your charger do the rest.